Using timestamps
Timestamps allow saving multiple versions of a backup file in the same
destination folder and automatically delete obsolete versions of the backup file.
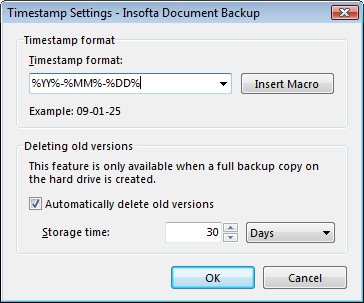
To enable timestamps and define its settings, click the Store backup versions in subfolders usings timestamps option on the Advanced tab and then click on the Timestamp settings... button.
 To get to the Advanced tab,
right-click on the backup item on the application's workspace, then select
Properties on the menu that appears, and then click on the Advanced tab.
The Timestamp format settings define the pattern of the timestamp to be used for naming the backup file.
To select the timestamp format:
Format options available:
You can customize timestamps by inserting macros in them.
To insert macros in timestamp:
For example, you can create a custom backup file named
MyDocuments_2007-07-07_2114.zip by creating a timestamp:
MyDocuments_%%YYYY%%-%%MM%%-%%DD%%_%%HH%%%%NN%%.
Deleting old versions
You can have the software automatically delete obsolete versions of your backup files.
To enable the automatic deletion of old backup files:
 To open the Timestamp Settings window, right-click on the backup item on the application’s workspace, then select Properties on the menu that appears, then click on the Advanced tab, and then click on the Timestamp Settings,,, button.
To enable timestamps and define its settings, click the Store backup versions in subfolders usings timestamps option on the Advanced tab and then click on the Timestamp settings... button.
 To get to the Advanced tab,
right-click on the backup item on the application's workspace, then select
Properties on the menu that appears, and then click on the Advanced tab.
The Timestamp format settings define the pattern of the timestamp to be used for naming the backup file.
To select the timestamp format:
- Pull down the Timestamp format menu.
- Select the desired format on the list that appears.
- Click OK to apply changes.
Format options available:
- %DD%-%MM%-%YY% – will display current date, month and year in the format: 20-07-07.
- %DD% %MMM% %YYYY% – will display current date, month and year in the format: 20 Jul 2007.
- %VERSION% - %DD% %MMM% – will display the backup version followed by current date and month in the format: 0001 – 20 Jul. This format is great for tracking the version of your backup data.
- %YY%%MM%%DD%%HH%%NN% – will display current year, month, date, hours and minutes in the format: 0707202114. This format is great for the manual ordering and sorting of backup files.
You can customize timestamps by inserting macros in them.
To insert macros in timestamp:
- In the Timestamp Settings window, click on the Insert Macros button.
- On the menu that appears, select the macro to be inserted in the timestamp.
- Repeat #2 for all macros.
- Edit the Timestamp format box as necessary.
For example, you can create a custom backup file named
MyDocuments_2007-07-07_2114.zip by creating a timestamp:
MyDocuments_%%YYYY%%-%%MM%%-%%DD%%_%%HH%%%%NN%%.
Deleting old versions
You can have the software automatically delete obsolete versions of your backup files.
To enable the automatic deletion of old backup files:
- In the Timestamp Settings window, select the Automatically delete old versions option.
- Click on the Storage time box and set the age of which the files must be in order to be auto-deleted.
- Pull down the units menu and then select the time unit for the Storage time option.
- Click OK to apply changes.
 To open the Timestamp Settings window, right-click on the backup item on the application’s workspace, then select Properties on the menu that appears, then click on the Advanced tab, and then click on the Timestamp Settings,,, button.


 Introduction
 Working with Document Backup
 Managing backup items